How to Create & Set Up QR Code Check in System to Enhance Event Experiences
Think back to the last event you attended. Was check-in a slow pen-and-paper lineup, or did you breeze in after you scanned a code on your badge? A modern qr code check in system turns that painful first impression into a fast, contactless moment that attendees appreciate.
Event organizers increasingly choose contactless check-in because it reduces queues, cuts staffing needs, and improves data accuracy. Attendees notice: contactless experiences feel faster and more professional, and organizers get cleaner registration data to act on.
Event planners can borrow from hospitality: according to HotelTechReport, keyless entry can lift guest satisfaction. Equally important, long waits erode satisfaction quickly — shortening the check-in process matters. If you want measurable improvements in throughput and attendee experience, implementing a QR-based check-in system that lets staff scan codes (or lets attendees self-scan via an app) is one of the fastest wins.
Book a demo of EventMobi’s QR check-in software to speed up the check-in process.
As an event organizer, speeding up the check-in process shows attendees you value their time — and a QR system does exactly that by letting people scan code badges or mobile confirmations sent by email.
In this article you’ll find clear steps to set up a reliable qr code check in system, best practices for the check-in process, and tips for adding QR codes to your event badges and confirmation emails.
What Is a QR Check-in Code?
A QR check-in code is a unique quick-response code assigned to each attendee that links directly to their registration record. In a qr code check in system, that unique code is the key that ties a person to their ticket, sessions, and any other stored information.
Using code check-in means attendees simply present a QR (on their phone, tablet, or badge) and staff scan it — no paper lists, no manual lookups, and far fewer bottlenecks at the registration desk.
How Do You Use a QR Code to Check In Guests at Your Event?
Guests typically receive a QR code via confirmation emails, in an event app, or printed on their event badge. When a guest arrives, staff scan the code with a tablet or smartphone running your check-in app, or the guest can self-scan at a kiosk for a true self-service event check-in.
Each code is unique and, when scanned, can reveal organizer-ready data such as:
- Which event or session the attendee is registered for
- The date and time of the registration or session
- The attendee’s name and contact information
- Sessions the attendee is registered to attend
- Whether the ticket is paid or requires follow-up
- Custom fields (meal preferences, CE requirements, sponsor tiers, etc.)
Example: John Doe receives a unique code in his confirmation email tying him to a paid ticket and three breakout sessions — when staff scan his code, the check-in app shows his name, ticket status, and session list instantly.
Key benefits of using a codes-based event check-in:
- Speed — scans take a fraction of a second on modern devices, dramatically reducing lines
- Accuracy — unique codes eliminate manual entry errors during registration
- Data capture — every scan can create timestamps and attendance logs for reporting
For a step-by-step guide on generating unique codes in your event platform, jump to the “How to Create a Check-in QR Code” section below.!
How to Scan a QR Code from Your Phone
In a QR code check in system, attendees can present their QR code on any mobile device, tablet, laptop screen, or printed badge — as long as the code is visible and unobstructed, staff can scan it. Modern smartphones (iOS and Android) can usually read QR codes directly from the native camera; some older devices may require a dedicated scanning app.
Checklist for staff devices before the event:
- Have a charged mobile device or tablet with a working camera
- Install or test the event check-in app (if required) and confirm camera permissions
- Verify network access (Wi‑Fi or cellular) for real‑time updates, or confirm that the app supports offline scanning
- Carry a spare battery pack or extra device to avoid downtime
How to Create a Check-in QR Code for an Event
Random QR generators work for static links, but for reliable event check-in you want unique codes tied to each registrant. Use an event management platform or registration management software to automate unique code generation and delivery.
Why use an event management platform?
- It stores registrant data (name, email, ticket type) and maps each profile to a unique code
- It embeds codes into confirmation emails and the event app so attendees receive them via email or in-app
- It enables scanning to surface attendee info (sessions, payment status) during check-in
Quick steps to generate and distribute unique QR codes:
- Create your event in the event management platform and configure ticket types and session options
- Import or collect registrations (spreadsheet import or registration form)
- Generate unique codes — most platforms do this automatically when a registrant is added
- Configure confirmation emails to include the QR or include it in the attendee’s profile in the app
- Test by sending a sample confirmation email, opening the QR on a mobile device, and scanning it with your check-in app
Example workflow: set up the event → import attendees → platform generates a unique code for each registrant → codes are sent via confirmation emails or appear in the event app → test scans on multiple mobile devices before doors open.
10 Tips for Managing Event Check-in with a QR Code Check in System
You’ve decided to use QR codes — now make the experience fast, reliable, and trackable. Below are ten practical tips to set up a smooth qr code check-in system that reduces lines, lowers staffing needs, and delivers better attendance data.
1. Choose your platform — pick the right event management system
Select a trusted event management or ticketing platform that supports unique code generation, attendee profiles, and onsite scanning. The right platform turns scattered registration data into an integrated visitor management and check-in system — saving time and reducing errors.
When evaluating systems, prioritize features, support, reviews, and whether the app integrates with your registration and CRM tools.

2. Create your QR codes automatically
Use the platform to auto-generate unique codes for each registration so codes are tied to attendee records. Auto-generated codes appear in confirmation emails and in-app profiles, ensuring every guest has one via email or the event app.
💡 Tip: Confirm the confirmation emails include a clear QR image and brief “how to use” copy for attendees.
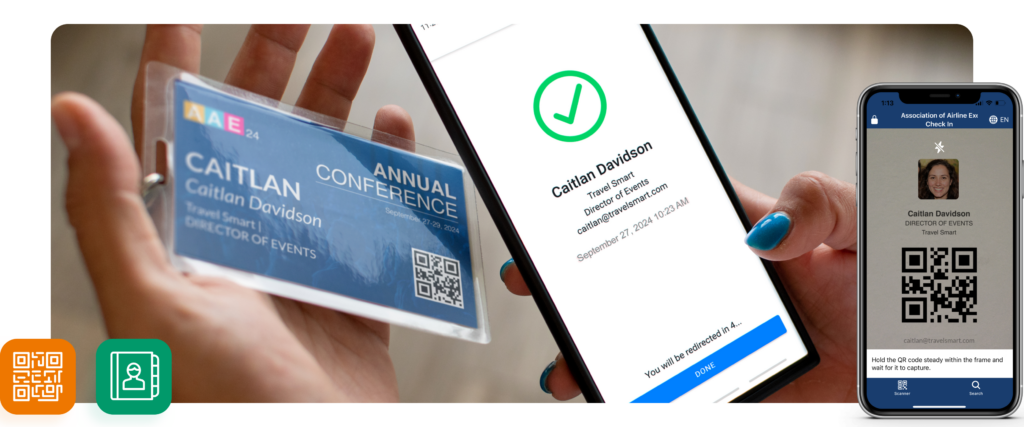
3. Design badges for speed and clarity
Place the QR code in a consistent, unobstructed spot on the badge (bottom-right or center-right works well). Keep fonts large for names and titles so staff can visually confirm identity quickly while scanning codes.
Consider pre-printing badges for VIPs or sending badges early by mail; otherwise plan onsite printing kiosks for last-minute registrations.
4. Decide check-in points — map the flow
Plan where attendees will check in: main entrance, session rooms, workshops, exhibitor areas. Map traffic flow to prevent chokepoints and communicate clearly when and where guests should scan their codes.
Tip: use signage and staff to direct guests to self-serve kiosks or staffed lanes depending on their preference.
5. Ensure your staff can scan — hardware checklist
Equip check-in staff with tablets or phones with working cameras, the check-in app installed, and permission to access the camera. Keep spare devices and battery packs onsite. If you expect high throughput, dedicate devices as scanners rather than multitasking devices.
Also confirm whether your app requires internet for real-time verification or supports offline scans with later sync.
6. Test everything — avoid the morning scramble
Run multiple dry-runs: generate a few test registrations, send confirmation emails, open the QR on various devices, and scan with every staff device. Test with venue Wi‑Fi and cellular networks and with the app’s offline mode (if available).
Testing on different mobile devices and tablet models will surface camera/contrast issues before the event day.
7. Print badges — or plan onsite printing
If you print ahead, mail or have rotating pickup stations. If you print onsite, designate staff to manage printers and a queue for badge reprints. Always have extras for walk-ins or replacements.
Onsite printing paired with self-service kiosks provides flexibility and reduces lines at staffed desks.
8. Track data in real time — use analytics
A robust system logs each scan with timestamps and location, letting you monitor event and session attendance in real time. Use these reports to identify busy periods, measure session popularity, and provide sponsors with verified attendance numbers.
Sample metrics to track: total unique check-ins, check-ins per hour, session attendance, and check-out timestamps.
9. Measure ROI — turn attendance into insights
After the event, combine registration data, scan logs, and sponsor/session metrics to calculate ROI. Knowing where attendees spent time helps justify sponsorship value and guides programming choices for future events.
Example: if a sponsored session shows high attendance and long average time in session, that’s a clear sponsorship win to present to partners.
10. Run a post-event review — collect feedback and iterate
Hold a debrief with staff and volunteers to review what went well and where bottlenecks occurred. Send short surveys to attendees asking about the check-in experience. Use these insights to optimize staffing, kiosk placement, and messaging for the next event.
Internal anchor: link your team to the “kiosk setup” and “check-in analytics” sections in your event playbook so improvements are documented and easy to implement next time.
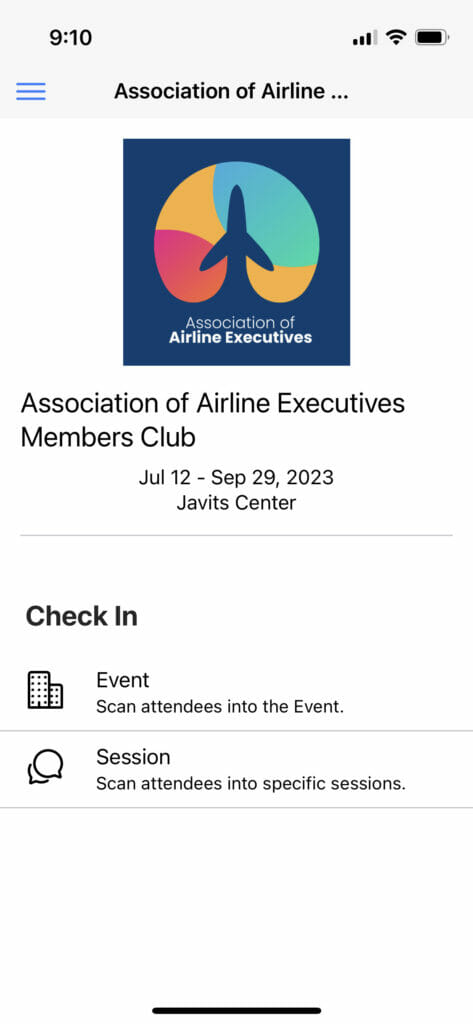
How to Use EventMobi for QR Check In
With EventMobi’s Badge Designer and Event Check-in App, setting up a reliable qr code check in system is straightforward. The platform ties unique codes to attendee records, surfaces registration data at scan time, and supports both staffed and self-service check-in workflows.
The Onsite App lets your team check attendees in and out for the overall event or for individual sessions. Or you can enable Kiosk Mode to turn any tablet or laptop into a self-service station so guests can scan codes themselves — perfect for reducing queues and reallocating staff to higher-value tasks.
Below are clear, actionable steps to set up EventMobi for code check-in and get your check-in system ready before doors open.
Add your attendees
Start by building your attendee list in the Experience Manager. You can add attendees three ways:
- Manually with the ‘Add Person’ button for small lists or VIPs
- Import bulk registrations from a spreadsheet (CSV) to scale quickly
- Sync profiles from your registration or ticketing platform for live updates
Expected outcome: each attendee receives a unique QR code linked to their profile and registration details so scans surface names, ticket types, and session registrations during check-in.
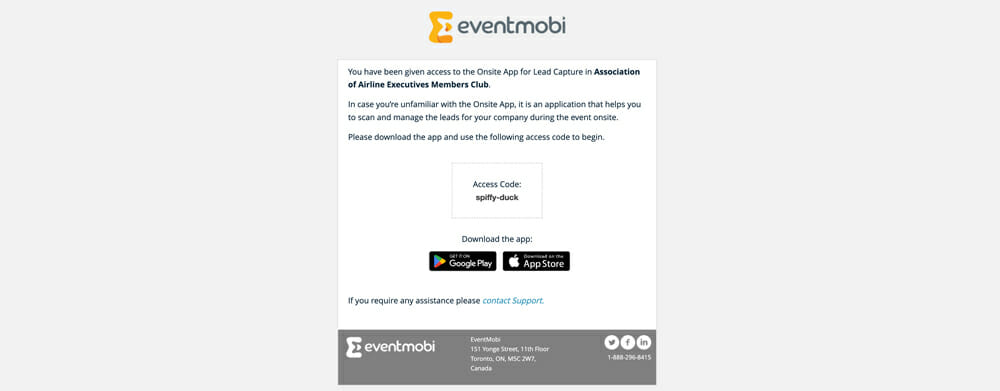
Give your check-in staff access to the app
From the Onsite App area in Experience Manager, invite staff who will manage the check-in process. Invitations go out via email and include a unique Access Code for logging into the Check-in App.
Practical tip: assign roles (staff, supervisor, printer operator) so permissions match responsibilities and reduce mistakes during busy check-in periods.
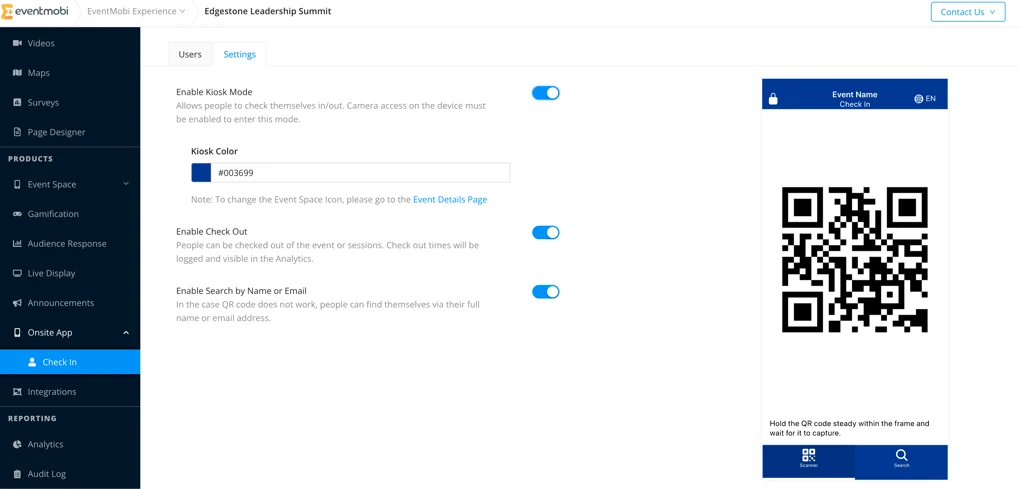
Customize your check-in process
Open the Check In Settings in Experience Manager to configure options that match your event flow. Key settings include:
- Enabling Kiosk Mode — create self-service kiosks that let attendees scan with the front-facing camera; name each kiosk for analytics attribution
- Enabling Check Out — capture how long attendees spend at the event or in sessions for CE credits and sponsor reporting
- Enabling Search by Name or Email — provide a fallback if someone can’t access their QR in the app or loses their badge
Use the Onsite App to manage check-ins
Organizers can log into the Onsite App with their Experience Manager credentials. After selecting an event, choose between Event or Session Check In and use the app’s menu to access Check In, Check Out, Search, and Kiosk modes.
For staffed lanes, use Check In to scan badges and confirm registration details. For self-serve, deploy Kiosk Mode at entrances so attendees can scan their own codes and move on.
If you’re setting up a kiosk, follow these quick steps:
- Open the Onsite App on the device you want to convert into a kiosk and tap “Kiosk”
- Give the kiosk a clear name (e.g., “Main Entrance Kiosk A”) — this shows up in analytics
- Choose the kiosk type (Check In or Check Out); you can switch types as needed during the event
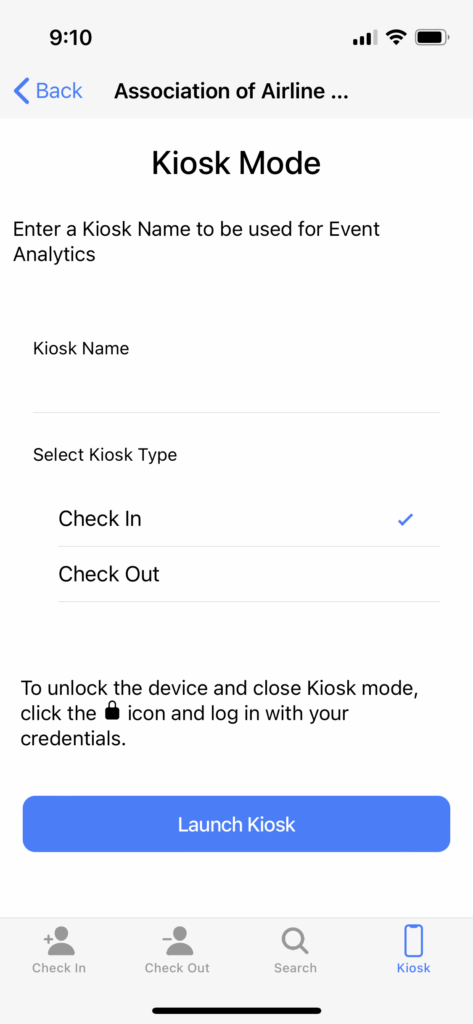
While in Kiosk Mode, attendees scan their own QR codes to check in or out. If Search is enabled, staff can also look up attendees by name or email as a backup.
Troubleshooting quick fixes
- Camera won’t scan: increase QR size on screen or print, check contrast, and clean the lens
- No network: switch app to offline mode (if supported) or queue scans for sync later
- Lost badge: use the Search by Name/Email option to check in the attendee and print a replacement badge
Real-world outcome: using a mix of staffed lanes and kiosks typically cuts average check-in time per attendee from minutes to seconds, freeing staff to assist with VIPs and troubleshoot exceptions.
Tips for Designing Badges for QR Code Check-In
Beyond speeding check-in, a well-designed conference badge improves first impressions, reinforces branding, and helps attendees identify each other — all while keeping the QR code easy to scan.
- Make a great first impression on attendees
- Help attendees identify each other
- Serve as a branding opportunity for your event and organization
Use these practical badge-design guidelines to balance aesthetics and the technical needs of a codes-based event check-in system.
Make them visible at a distance
Use large, legible fonts for names and large contrast areas so badges can be read across a room. For readability, keep name text at least 18–24 pt (depending on badge size) and avoid overly busy backgrounds behind text.
Include your event logo
Place the event logo prominently but leave sufficient clear space around the QR code. Logos boost branding while a reserved quiet zone around the code ensures reliable scanning.
Include your event title
Printing the event title on the badge creates cohesion and gives attendees a keepsake. Keep the title short so it doesn’t compete with name and QR visibility.
Brand your badges
Reflect your brand with colors and fonts, but maintain high contrast between the QR code and its background. Use brand elements sparingly so the code and attendee name remain the focal points.
Add the schedule
Consider printing a compact schedule or session highlights on the back of the badge for quick reference. This adds utility without crowding the front where the QR and name need to remain clear.
Add the map
For large venues, a small map or venue key on the reverse helps attendees navigate and reduces questions at information desks — useful for improving overall event experience.
Add networking prompts
Include a “Talk to me about…” or interest tag to spark conversation. Small prompts encourage engagement while adding personality to badges.
Keep it simple
Less is more: prioritize name, organization, and the QR code on the front. For QR best practice, keep a quiet zone (blank margin) around the code, high contrast (dark code on light background), and a minimum printed size — commonly at least 2 cm × 2 cm for desk scanning, larger for handheld scanning across distance. For print, ensure files are exported at 300 DPI and test printed codes before mass production.
Dos & don’ts for QR placement:
- Do place the QR on the front bottom-right or center-right with a clear quiet zone
- Do test printed and on-screen codes with the devices your staff will use to scan
- Don’t overlay logos or decorative patterns on the QR code
- Don’t use low-contrast color combinations (e.g., light gray code on white)

Answers to Common QR Code FAQs
Conclusion: A qr code check in system gives events fast, accurate check-ins and valuable attendance data. If you want a hands-on walkthrough, consider booking a demo or downloading a pre-event checklist to test your setup before your next event.