The Event Registration Checklist: Everything You Need Before You Go Live
Opening event registration before everything is properly configured is one of the most avoidable mistakes in event planning. A registrant who encounters a broken payment flow, a confirmation email that never arrives, or a form that collects the wrong data is unlikely to give you a second chance.
This checklist covers everything you need to set up, test, and verify before registration goes live. It is organized in the order you should work through it. The testing section at the end is not optional.
1. Before You Build: Planning Decisions
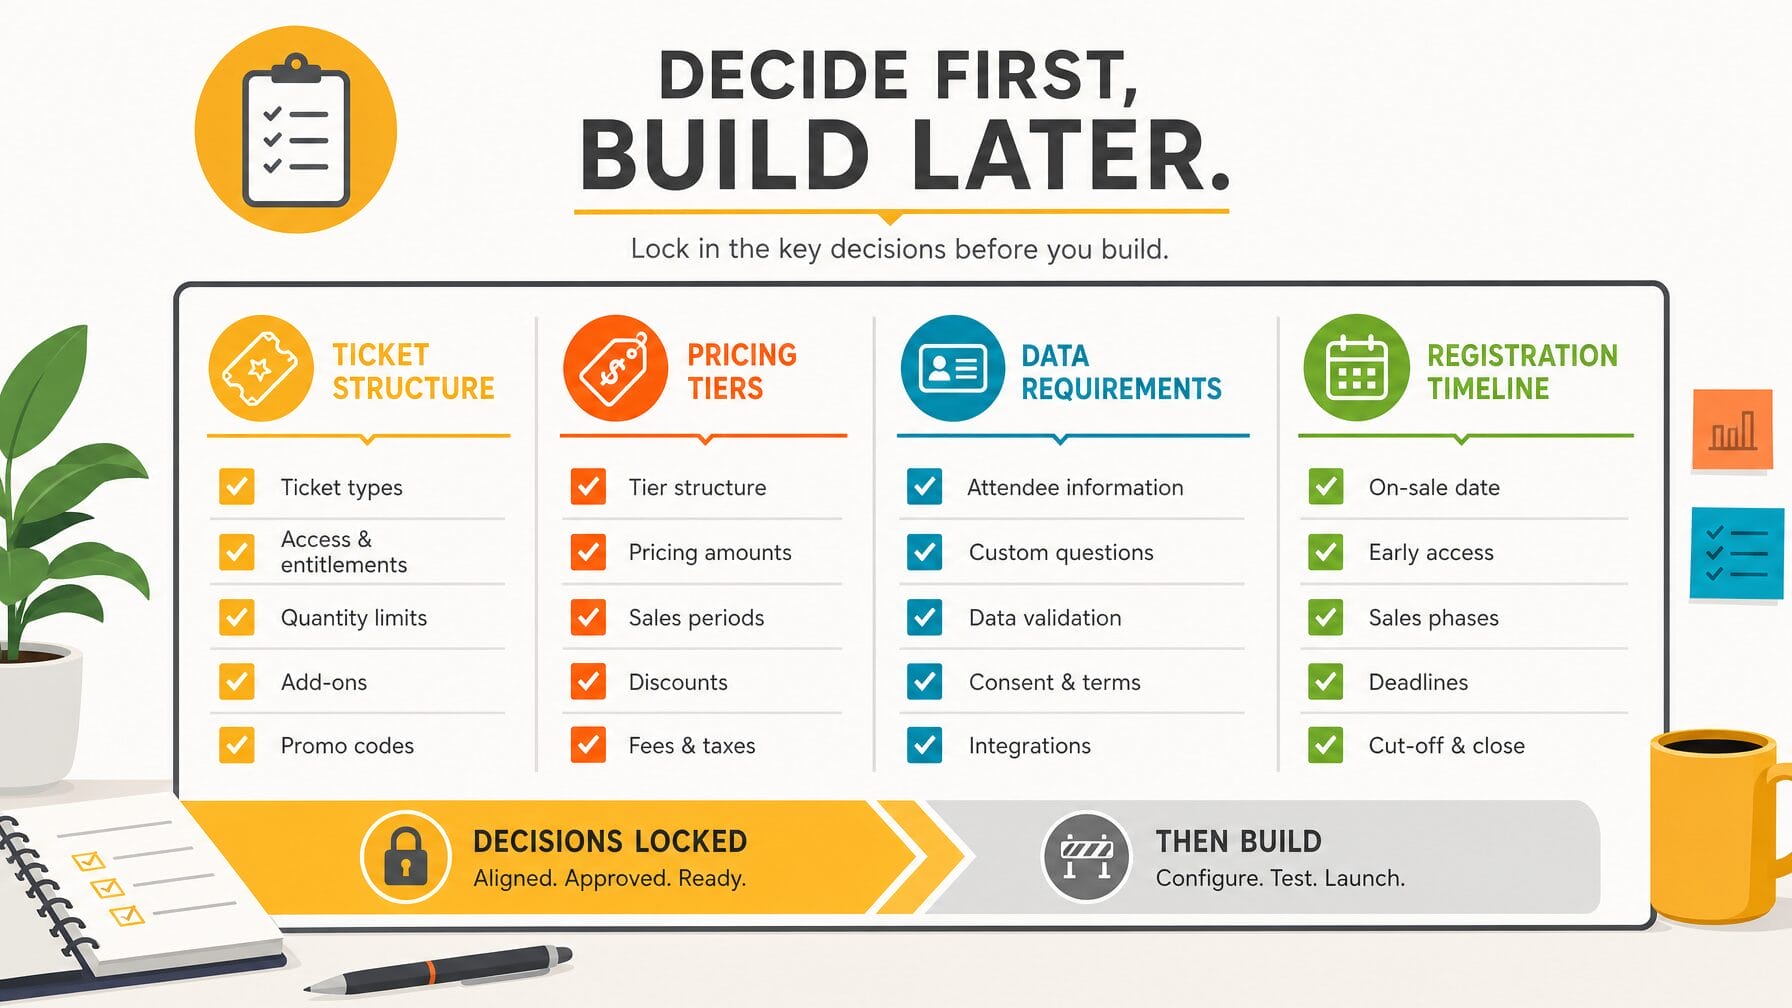
Before you open your form builder, confirm four things: your ticket structure, your pricing, your data requirements, and your registration timeline. Locking these decisions first is what prevents costly rework once the form is live. Everything you build afterward depends on them.
The decisions you make before opening your form builder determine how much rework you will need to do later. Get these confirmed first.
Define your ticket structure before touching the form. How many ticket types do you need? What is the pricing for each? Which tickets are public and which are hidden? Are there early bird tiers with specific deadlines? What are the capacity limits?
Also confirm your data requirements upfront. What information do you actually need from each attendee type? Knowing this before you build the form prevents you from adding fields mid-registration or, worse, realizing after the event that you collected the wrong data.
- Event date, venue, and format confirmed
- Ticket types, pricing, and quantity limits defined
- Early bird pricing deadline confirmed if applicable
- Tax and VAT rates confirmed for paid events
- Registration open and close dates set
- Audience defined: public, private, members only, or invite only
- Data requirements confirmed for each attendee type
- Payment gateway confirmed and credentials available
- Internal stakeholders aligned on registration process
What should I decide before building a registration form? Decide your ticket types, pricing, capacity limits, and the exact data you need from each attendee type. Confirming these before you build prevents mid-registration form changes and bad data.
2. Event Website
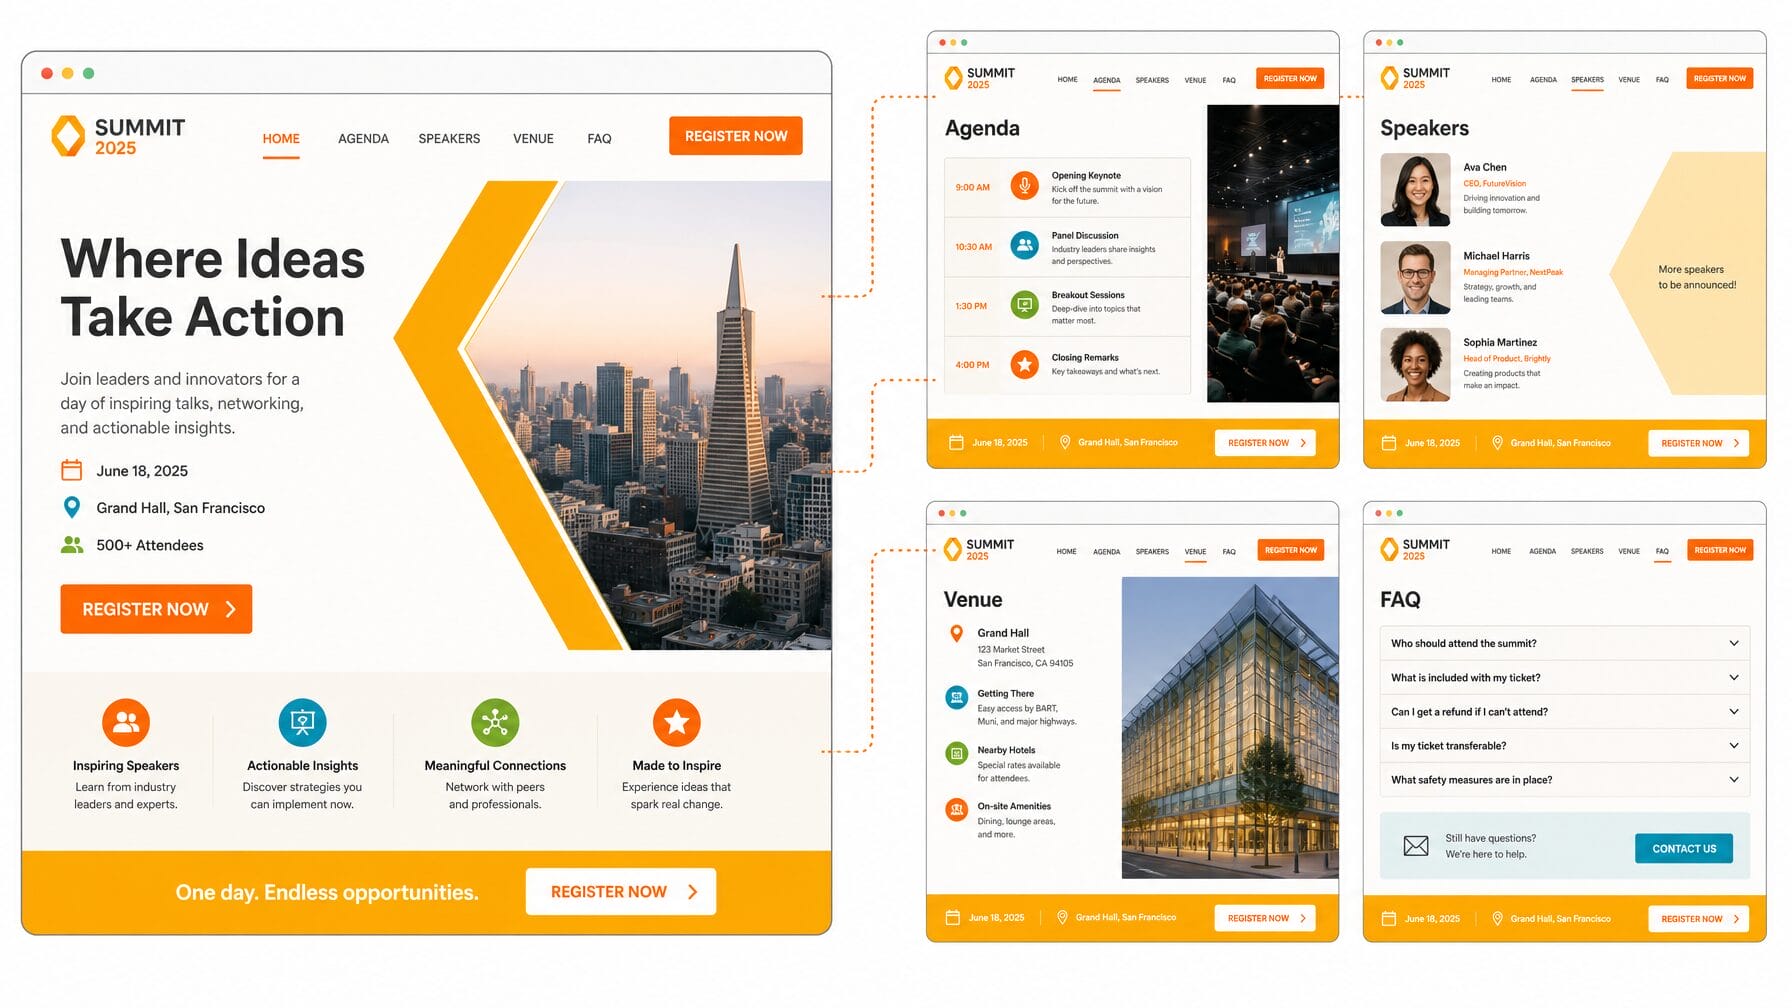
Your event website is where visitors decide whether to register, so it needs to answer their questions before they reach the form. A clear multi-page site with agenda, speaker, venue, and FAQ pages gives undecided visitors what they need to commit. Keep the registration call to action visible on every page.
A multi-page site with dedicated agenda, speaker, venue, and FAQ pages gives undecided visitors the information they need to commit. Navigation should be clear and persistent. The registration call to action should be visible from every page without scrolling.
Do not wait until the website is fully complete to publish it. A published page with placeholder content is better than an unpublished page that no one can find. Update it as details are confirmed.
- Brand colors, fonts, and logo applied
- Homepage published with event name, date, location, and registration call to action
- Agenda or program page published
- Speaker page published with names, titles, and bios
- Venue page published with address, accommodation options, and travel details
- FAQ page published addressing the most common attendee questions
- Sponsor and partner page published if applicable
- Navigation configured with links to all published pages
- Sticky header enabled
- Registration button visible and linked correctly on all pages
- Mobile display tested on at least two device types
- Privacy policy and terms linked in the footer
Watch the EventMobi Product Tour and learn how to create the best registration experience for every attendee type.
3. Registration Form
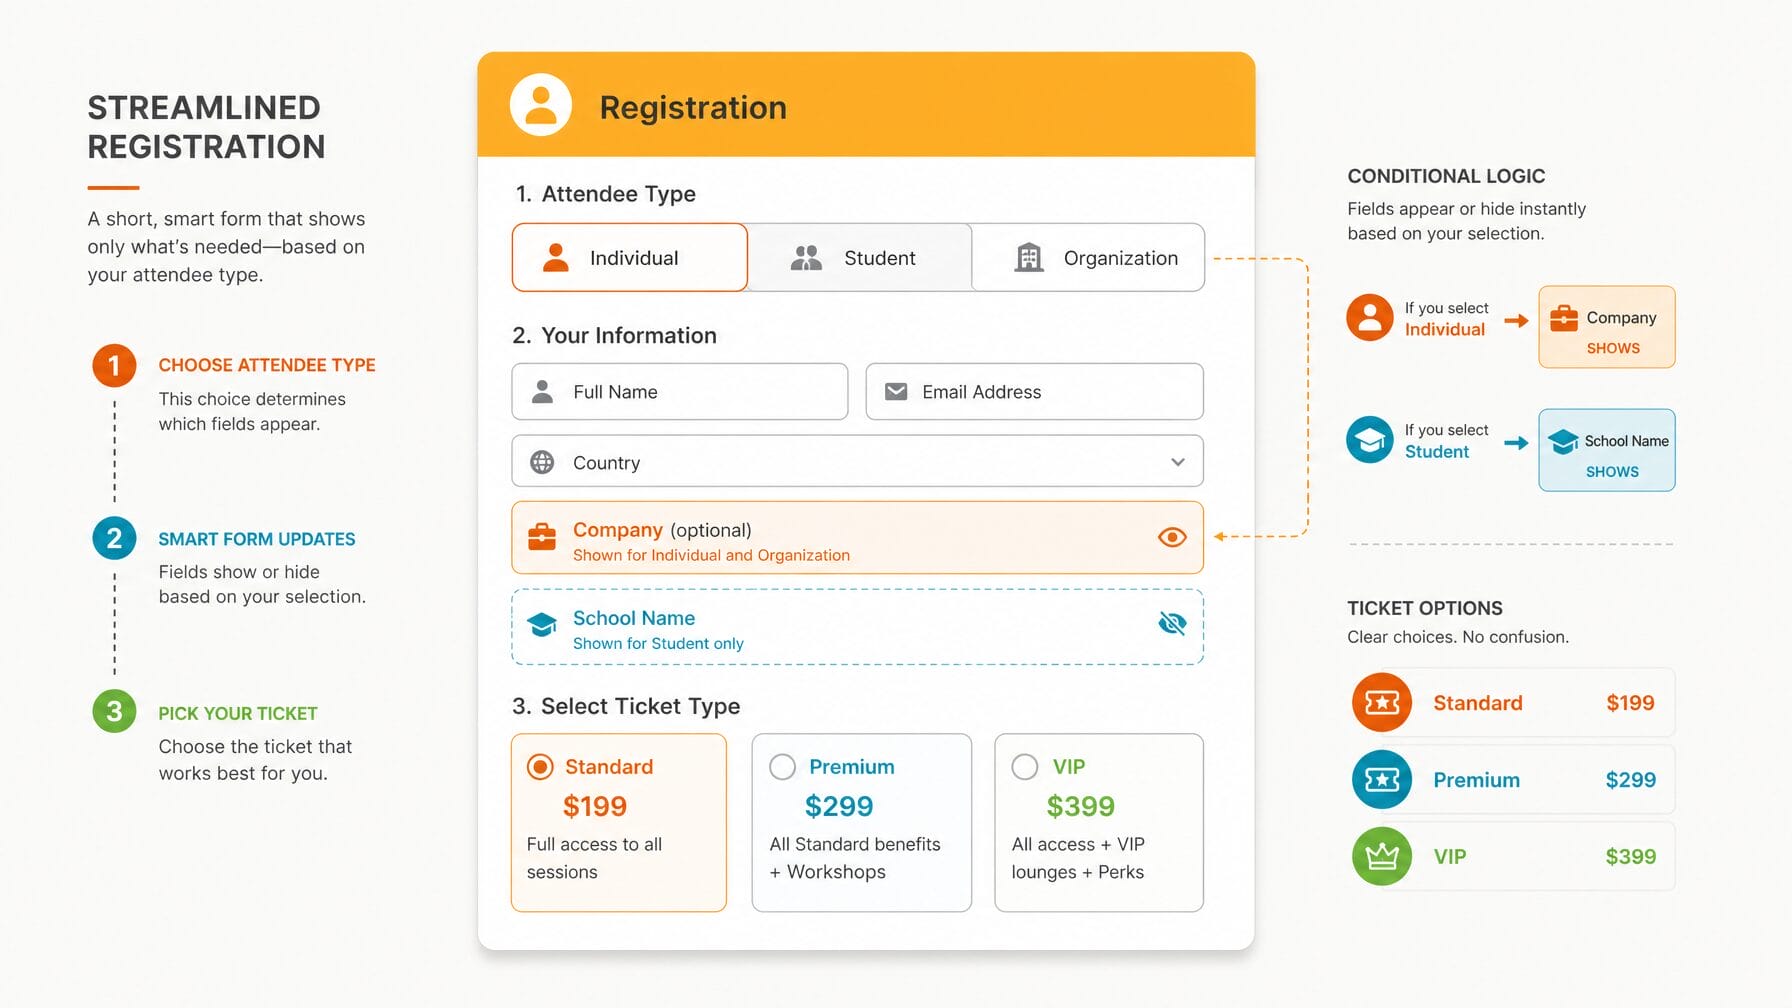
Your registration form is where visitors become registrants, so keep it as short as possible and collect only the data you will actually use. Every unnecessary field, confusing label, or missing option is a reason to abandon. For events with multiple attendee types, use conditional logic so each person sees only the fields relevant to them.
Keep the form as short as possible. Collect only the data you will actually use. For events with multiple attendee types, use conditional logic to show each person only the fields relevant to them. A VIP attendee and a general attendee should not see the same form.
Pay particular attention to how ticket types are presented. The options should be clear, the pricing unambiguous, and the difference between ticket types easy to understand at a glance.
- Default fields confirmed: first name, last name, email address at minimum
- Custom fields added for any additional required data
- Field labels clear and unambiguous
- Only genuinely required fields set as mandatory
- Form sections organized logically
- Form Conditions configured for fields that show or hide based on prior selections
- Ticket types visible and correctly priced
- Hidden ticket types confirmed as hidden
- Promo codes created and tested for hidden ticket types
- Ticket quantity limits set
- Registration open and close dates configured
- Public or private access setting confirmed
- RSVP flow configured if applicable, with invitation list uploaded
- Terms and conditions displayed if required
How many fields should a registration form have? Only as many as you will actually use. Ask for the minimum needed to register and communicate with each attendee type, then use conditional logic to hide fields that do not apply.
4. Payment Configuration
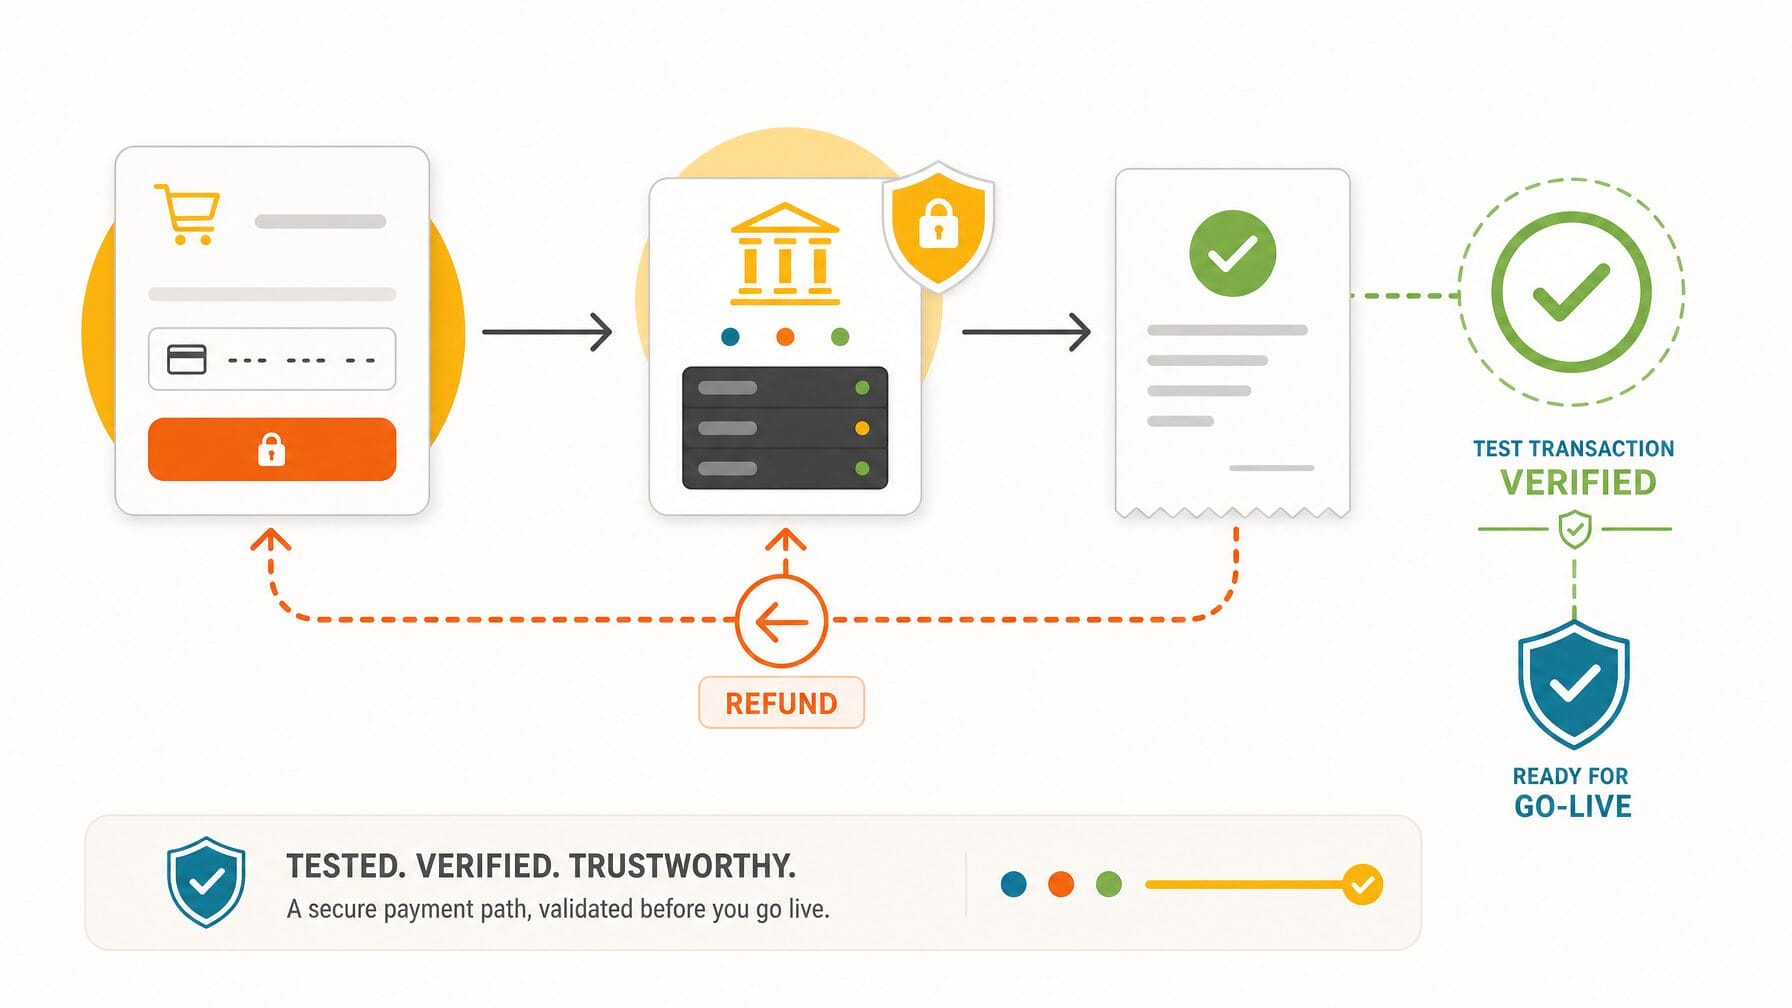
Test every part of the payment flow before go-live, including the confirmation receipt and the refund process. Payment errors on launch day erode trust, generate support emails, and can cause registrants to abandon entirely rather than try again. Most registration platforms process refunds through the payment gateway directly, not through the platform itself.
Every element of the payment flow needs to be tested before go-live, including the confirmation receipt and the refund process. Note that most registration platforms process refunds through the payment gateway directly, not through the registration platform itself. Make sure your team knows this before the first refund request arrives.
- Payment gateway connected and live (not in test mode)
- Test transaction completed successfully
- Correct currency configured
- Tax and VAT rates assigned per ticket type where applicable
- Payment confirmation email tested and confirmed as sending
- Receipt format reviewed for accuracy
- Refund process confirmed and communicated to the team
- Free ticket flow tested separately from paid ticket flow
How are event registration refunds processed? On most registration platforms, refunds are issued through the connected payment gateway, not the registration platform itself. Confirm the exact steps with your team before the first refund request arrives.
5. Email Communications
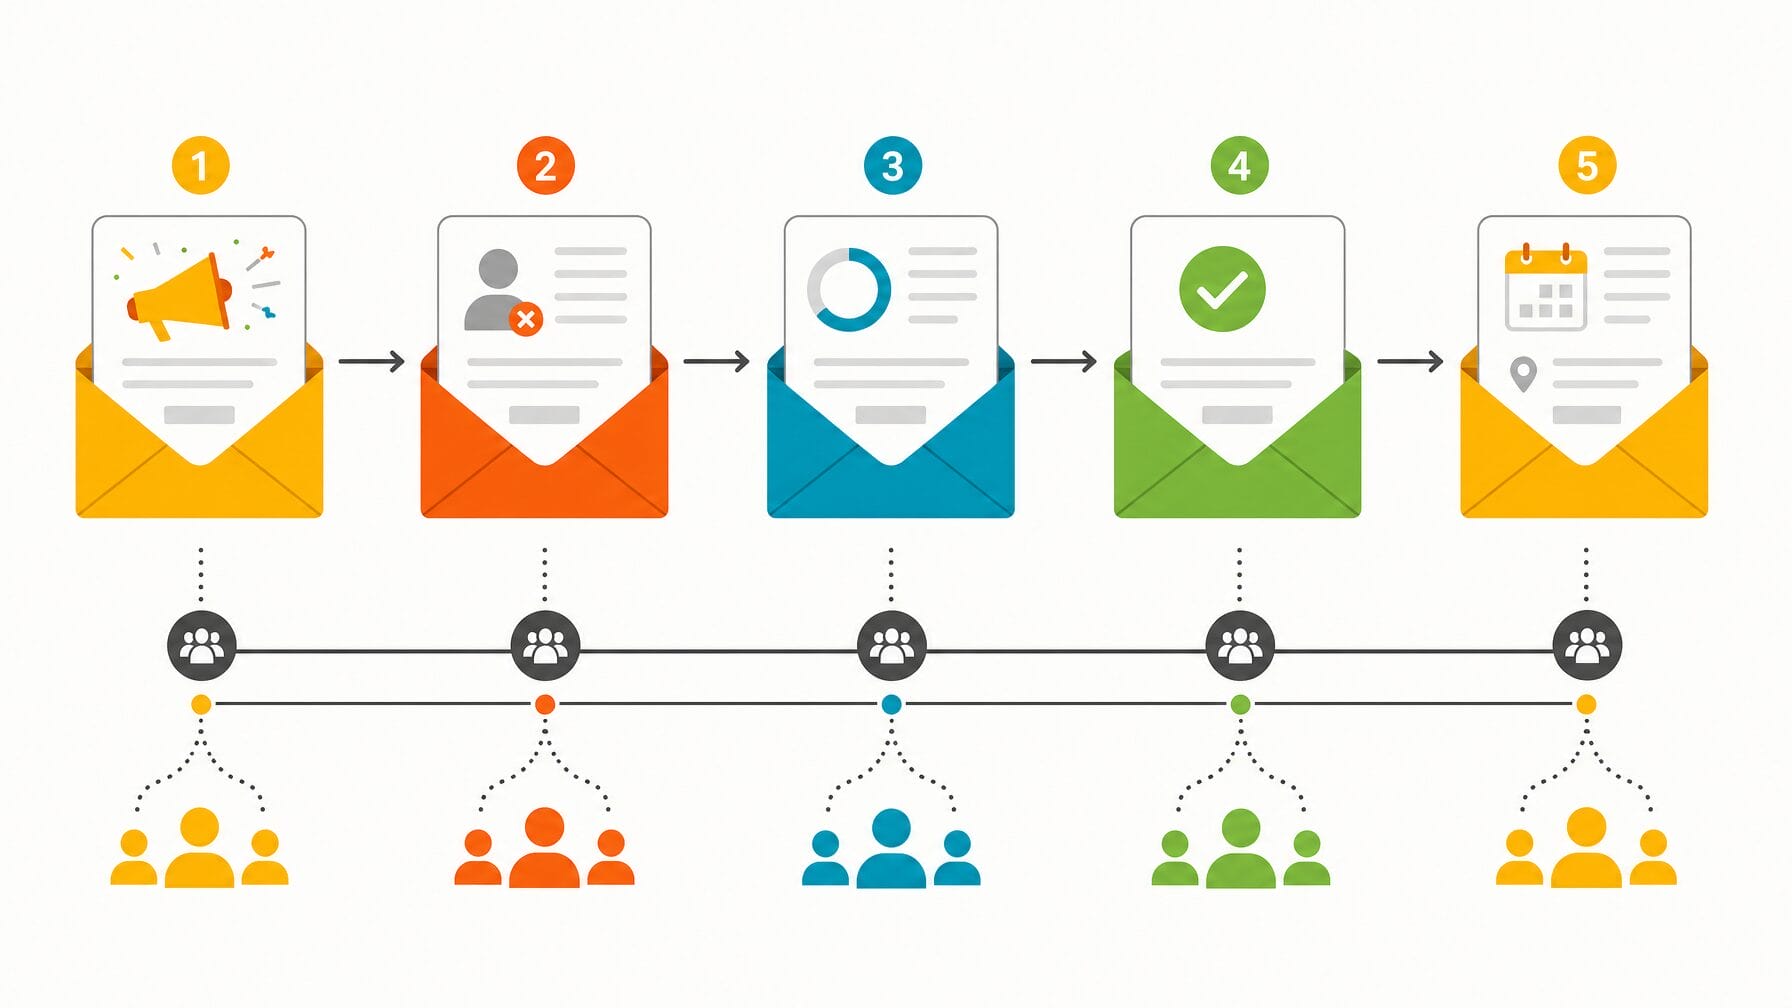
Plan your full communications sequence before registration opens, because registration emails are often the first direct message an attendee receives from you. At minimum, prepare an invitation or announcement email, a reminder to non-registrants, a targeted message to incomplete registrants, and a pre-event logistics email. Segment each one so no one gets the wrong message.
Beyond the confirmation email, plan your full communications sequence before registration opens. At minimum: an invitation or announcement email, a reminder to non-registrants, a targeted message to incomplete registrants, and a pre-event logistics email to confirmed attendees. Each of these should be segmented appropriately. Sending a registration reminder to someone who has already registered is a basic error that damages credibility.
- Confirmation email configured, tested, and confirmed as sending on registration completion
- Confirmation email content accurate: event name, date, location, next steps, contact information
- Sender name and reply-to address configured correctly
- Email branded with organization logo and colors
- Invitation email drafted for RSVP or private registration flows
- Reminder email to non-registrants drafted and scheduled
- Reminder email to incomplete registrants drafted and scheduled
- Post-registration logistics email drafted and scheduled
- All emails segmented by registration status
- Unsubscribe link present in all emails
- All emails sent to an internal test address before going live
Which emails do I need before registration opens? At minimum, prepare a confirmation email, an invitation or announcement email, a reminder for non-registrants, a follow-up for incomplete registrants, and a pre-event logistics email, each segmented by registration status.
6. Access Controls and RSVP
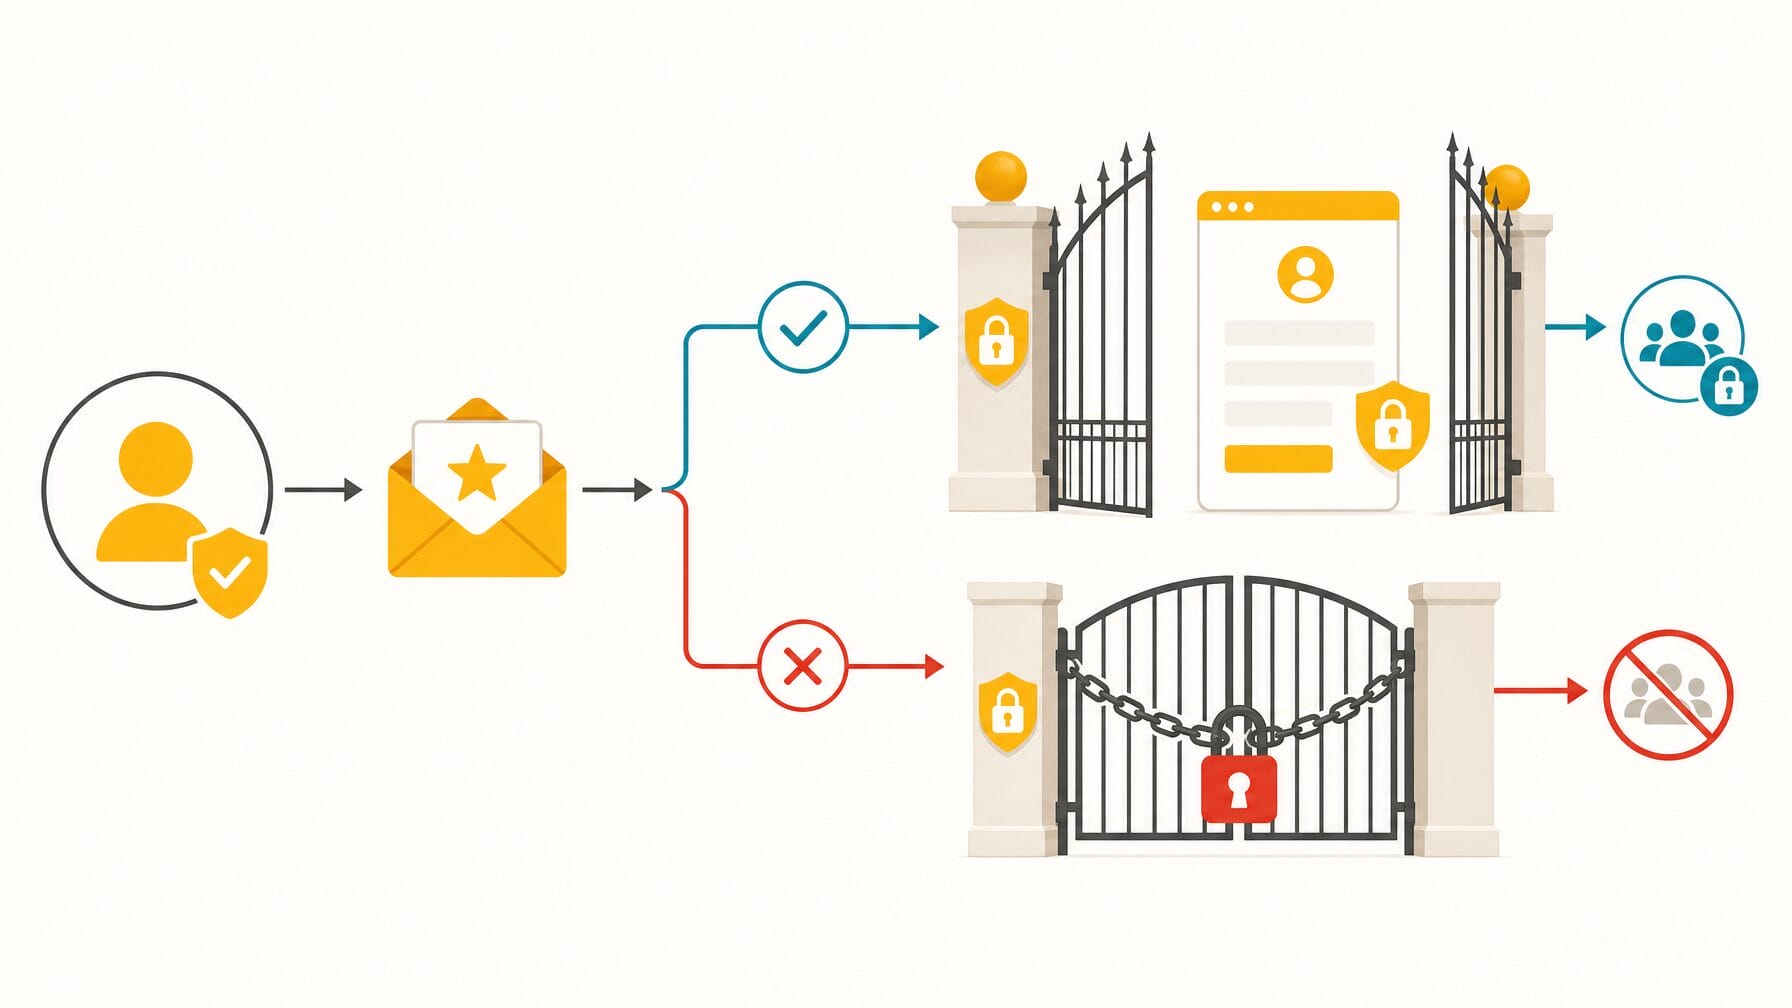
For invite-only or member-gated events, verify access controls before any invitation goes out. A private event that is accidentally public, or an RSVP flow that does not restrict access correctly, creates problems that are difficult to resolve after the fact. Test the full flow end to end before you send.
Test the full RSVP flow end to end: send the invitation, accept it, confirm the registration form is accessible, then test the decline flow and confirm the form is not accessible to declined invitees.
- Registration set to private if the event is invite-only or member-only
- Invitation list uploaded and reviewed for accuracy
- RSVP acceptance flow tested end to end
- RSVP decline flow tested: declined invitees cannot access the registration form
- Promo codes tested for hidden ticket types
- Public registration confirmed as inaccessible for private events
7. MobiAI Reg Concierge
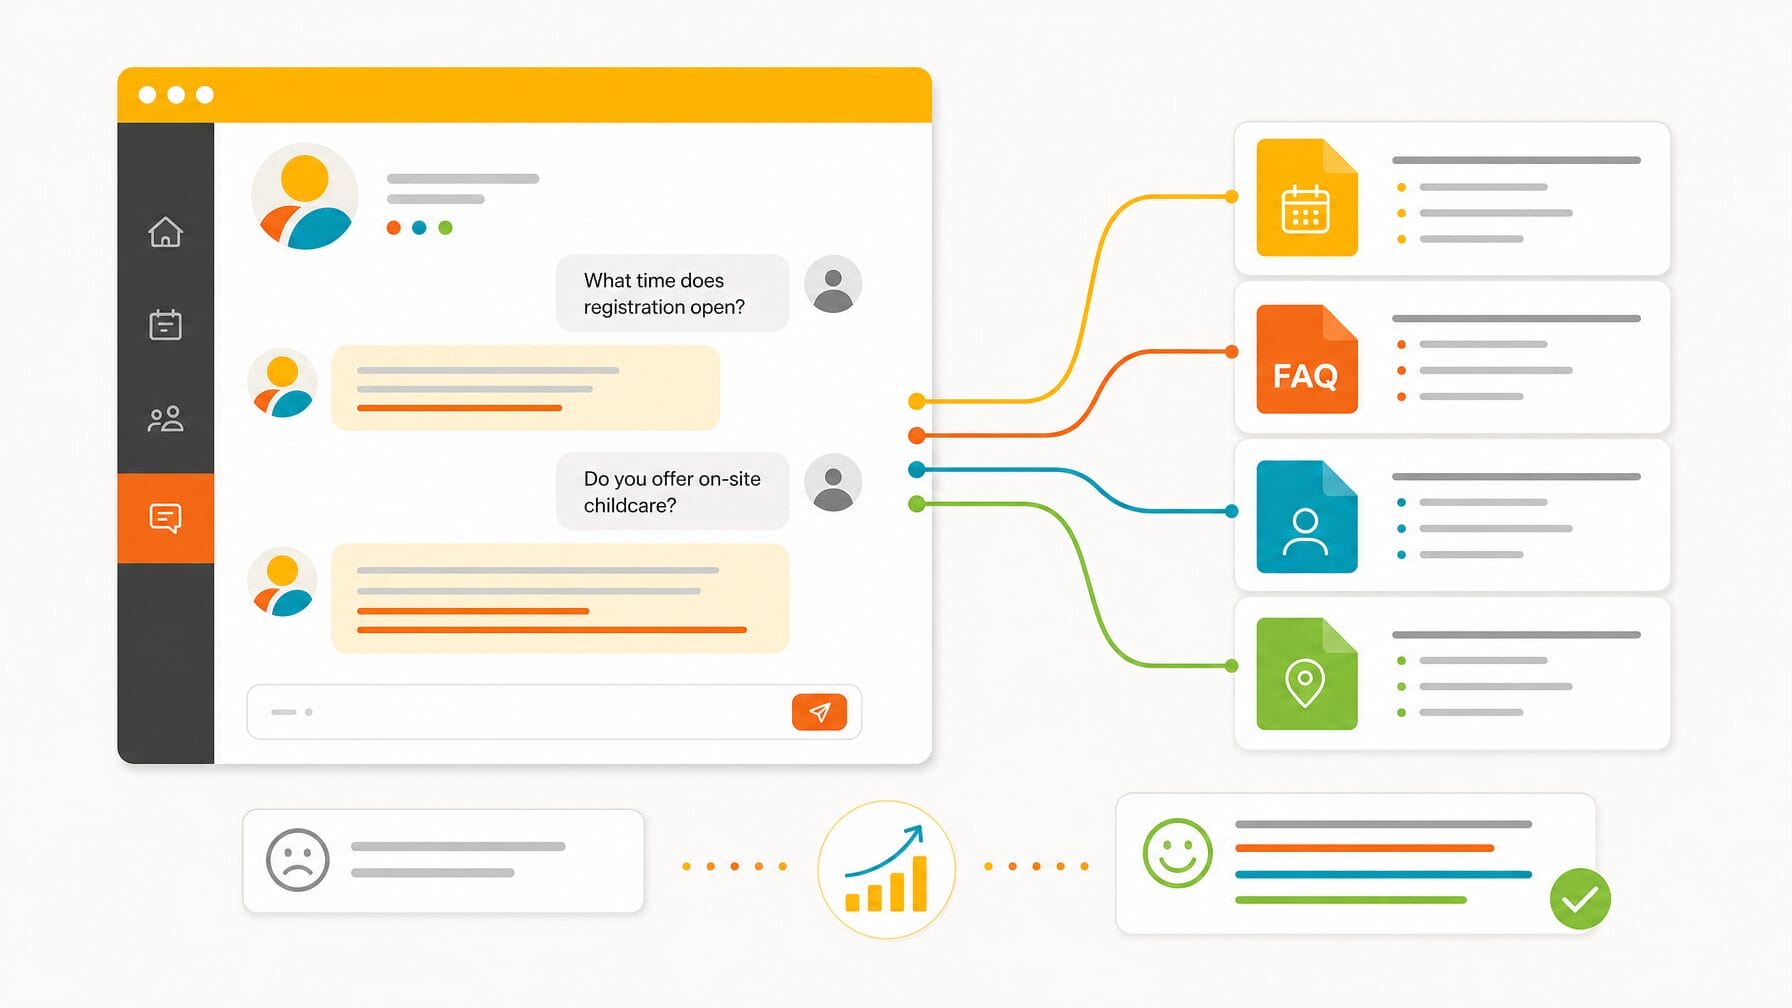
If you are using MobiAI Reg Concierge on your event website, the quality of the configuration directly determines the quality of the responses. The most common setup mistake is uploading too little content, so upload your most detailed internal documents, not just the public-facing FAQ. The concierge uses that content to answer the specific questions visitors actually ask.
The most common setup mistake is uploading too little content. Upload your most detailed internal documents, not just the public-facing FAQ. The concierge will use that content to answer the specific, detailed questions that visitors actually ask.
- MobiAI Reg Concierge enabled from Experience Manager
- Tone of voice selected or custom persona written
- Welcome message configured
- 3 to 5 suggested questions added, tailored to your most common visitor inquiries
- Supporting documents uploaded: event guide, FAQ, speaker bios, session details, venue logistics, sponsor information
- Custom urgency instructions added if applicable
- Fallback contact message configured
- Concierge tested by asking common attendee, sponsor, and speaker questions
- Any gaps in responses addressed by uploading additional documentation
Why is my AI concierge giving weak answers? Usually because it has too little content to work from. Upload detailed internal documents, not just your public FAQ, then test with real attendee, sponsor, and speaker questions and fill any gaps you find.
8. End-to-End Testing
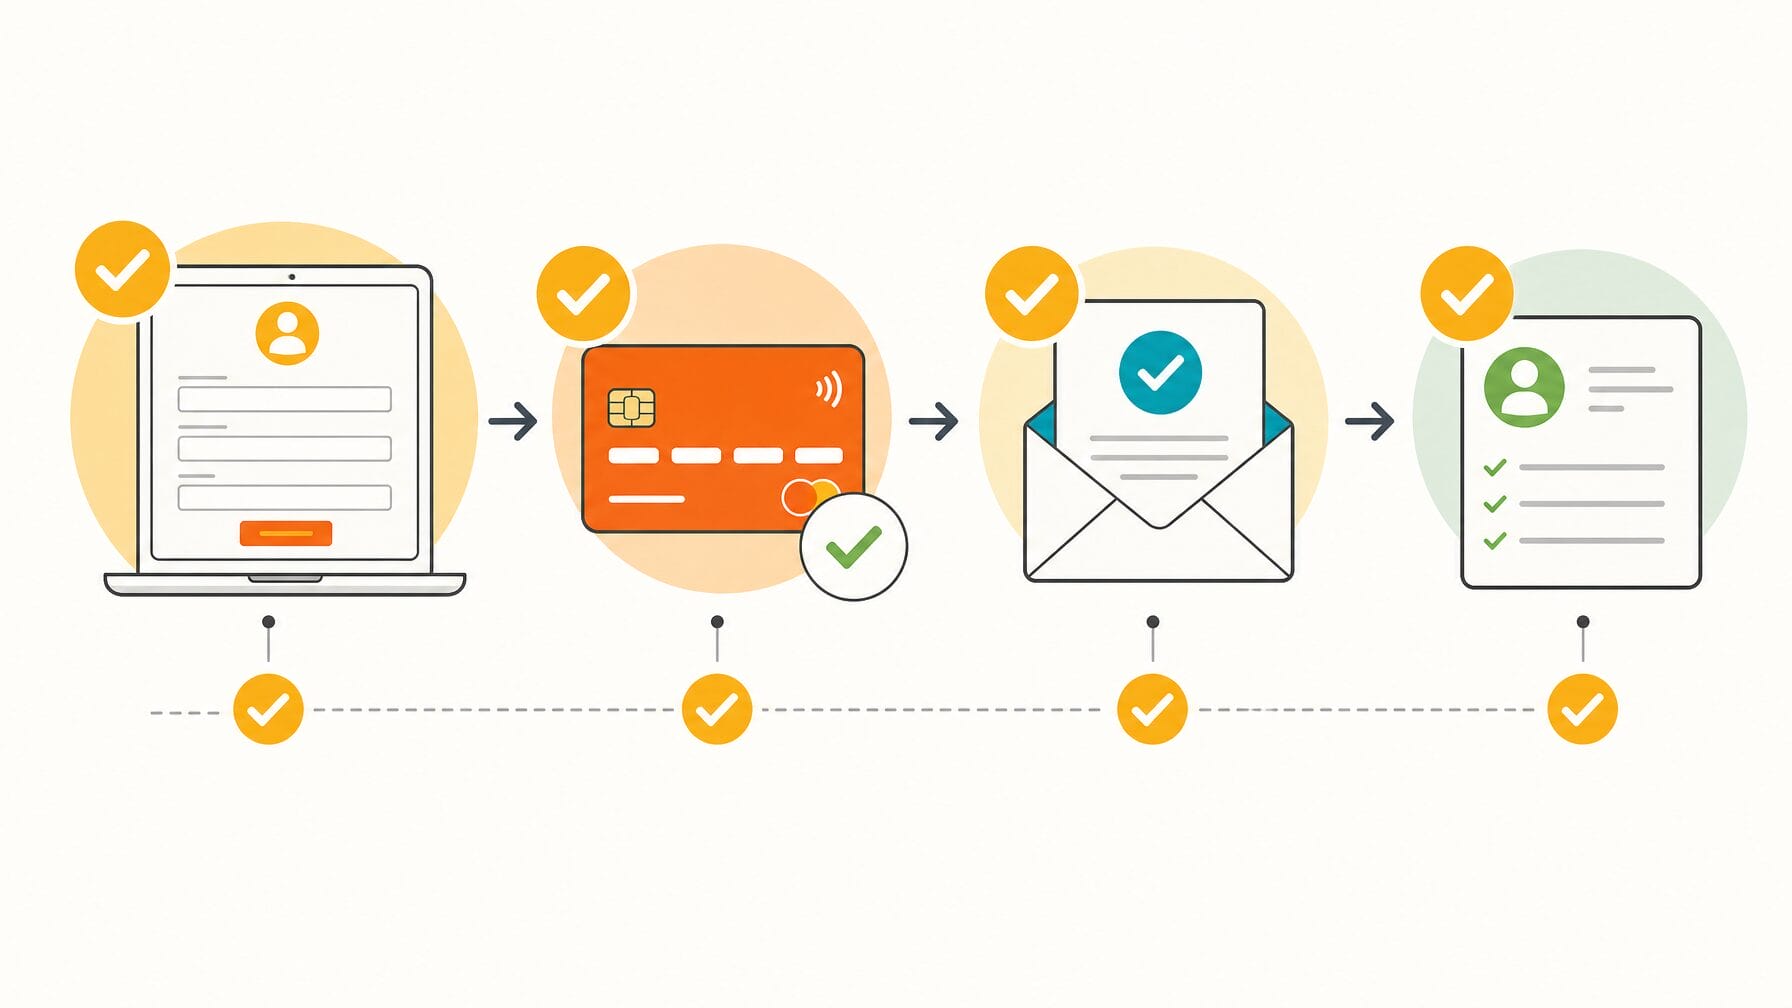
The only reliable way to find registration problems before your registrants do is to complete a real test registration for every ticket type. Do not just click through the form; submit it with a real email address and verify that payment processes, the confirmation email arrives, and the registrant appears correctly in your platform. This section is not optional.
Do not test by clicking through the form without submitting. Complete a real test registration for every ticket type, using a real email address, and verify that every subsequent step works correctly: payment processes, confirmation email arrives, registrant appears correctly in your platform, registration status updates.
Ask a colleague to complete a test registration without any guidance and note every point of confusion. What is obvious to the person who built the form is not always obvious to someone encountering it for the first time.
- Test registration completed as a general attendee, end to end
- Test registration completed for each ticket type, including hidden tickets via promo code
- Test registrant appears correctly in Experience Manager
- Registration status updates correctly after each test
- Confirmation email content accurate for each ticket type
- RSVP flow tested end to end if applicable
- Mobile display tested: form, website, and confirmation email
- Tested in at least two browsers
- Colleague completed a test registration without guidance
- All test registrations removed or voided before go-live
How do I test event registration before launch? Complete a real submission for every ticket type using a real email address, then confirm payment, the confirmation email, and the registrant record all work. Ask a colleague to register with no guidance to catch points of confusion.
9. Go-Live
Before you send the first promotional email, run through this final check to confirm test data is cleared, the payment gateway is live, and your team knows the go-live date. These are the settings most likely to cause a launch-day problem if missed.
- All test registrations removed
- Payment gateway confirmed as live, not in test mode
- Registration open date and time confirmed
- First promotional email scheduled or ready to send
- Team briefed on registration process and go-live date
- MobiAI Reg Concierge confirmed as active if applicable
- Support contact available for any issues on go-live day
10. Post-Launch: First 48 Hours
Going live is not the end of the process. Monitor closely in the first 48 hours, because most configuration errors surface within the first few registrations. Watch that registrations appear correctly, confirmation emails send, and payments process in your gateway.
- First registrations confirmed as appearing correctly in Experience Manager
- Confirmation emails confirmed as sending to real registrants
- Payment transactions confirmed as processing in the payment gateway
- MobiAI Reg Concierge questions reviewed: any unanswered questions requiring additional content?
- Any issues logged and escalated to support immediately
- Registration numbers tracked against targets from day one
How Much Time Do You Need?
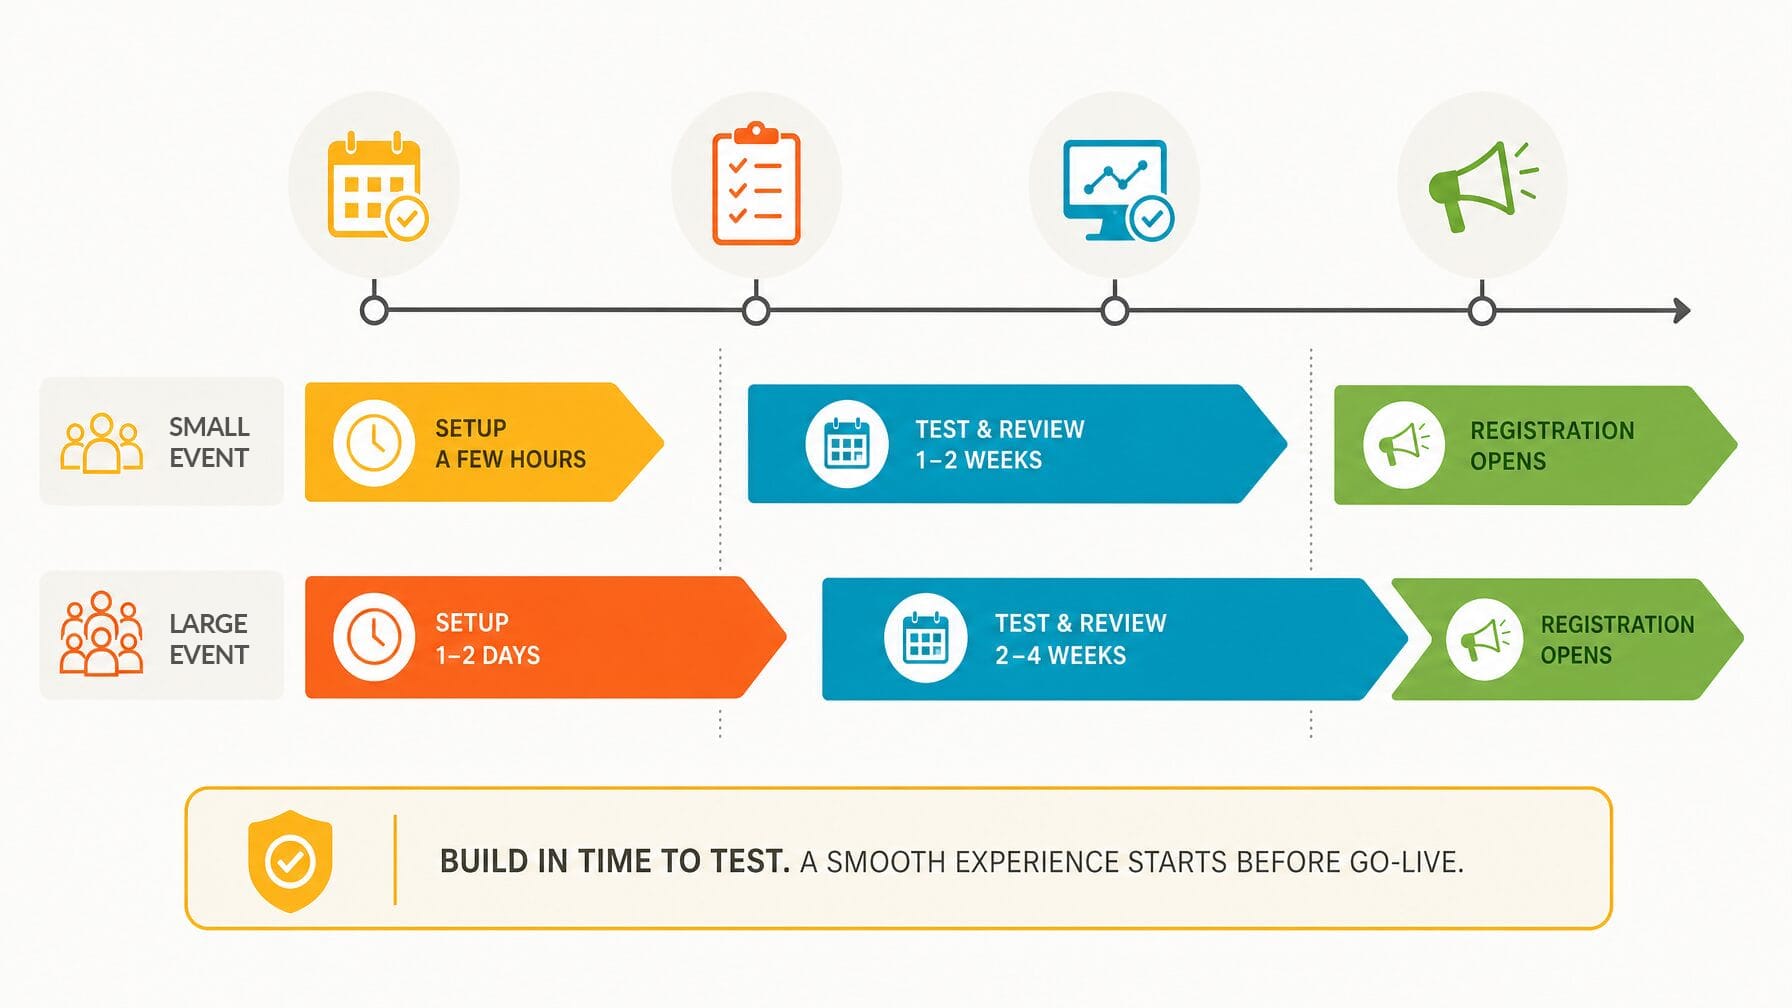
Plan on a few hours for a simple event and one to two days for a complex one, then leave one to two weeks between finishing setup and opening registration for testing and review. Large events with complex flows realistically need two to four weeks. Most registration problems come from a rushed, untested setup, not the platform.
A straightforward event with a single ticket type, a basic form, and a simple website can be set up in a few hours. A more complex event with multiple ticket types, conditional form logic, a multi-page website, and a fully configured AI concierge realistically takes one to two days of focused work.
EventMobi recommends a minimum of one to two weeks between completing your setup and opening registration, to allow time for thorough testing, internal review, and any last-minute adjustments before the first registrant arrives. For large events with complex registration flows, two to four weeks is more realistic.
The most common cause of registration problems is not a bad platform. It is a setup that was rushed and not properly tested. This checklist exists to prevent that.
Book your demo of EventMobi’s Registration software today to see how you can effortlessly create the right registration experience for every attendee type.
