Conference Badge Design: How to Create and Print in 7 Easy Steps

Cat Davidson is the Director of Customer Experience at EventMobi, bringing over a decade of hands-on expertise in event technology and planner success. Having worked directly with thousands of event professionals since 2014, Cat has an intimate understanding of the day-to-day challenges event planners face when implementing new technologies to achieve their event goals. In their current role, Cat leads initiatives that help event professionals maximize their technology investments while delivering exceptional attendee experiences.
Planning a successful conference involves countless details, but few elements have as much impact as your conference badge design. These seemingly simple items are your attendees’ constant companions throughout your event, influencing everything from first impressions to networking success. Whether you need slick conference badges for a large-scale industry event or event name tags for small meetings, we’ll guide you through the essential components of an effective badge creation strategy.
In this comprehensive guide, you’ll learn exactly how to make conference badges for smooth check-in and distribution, whether you’re making them at your office or using a badge printing service. We’ll break it down into seven simple steps that any event planner can follow, but first, let’s explore what conference badges entail and why they’re important.
Why Professional Conference Badge Design Matters
A well-designed event badge does more than identify attendees. It’s a powerful tool that helps your event run smoothly while making networking easier for everyone attending. When you get your badge design right, you’ll:
- Make great first impressions that match your event’s style.
- Help attendees network easily with clear, readable name tags.
- Strengthen your event brand.
- Speed up check-in processes.
- Help exhibitors collect leads efficiently.
Good conference badge design might seem simple, but it’s one of those details that can really help you achieve your event objectives. Let’s dive into how to get it right.
Step 1: Choose Your Badge Printing Method
Before diving into custom conference badge design or material selection, you need to decide how you’ll print your event badges. This critical decision impacts everything from material choices to design constraints and, ultimately, your budget. And while our first option doesn’t actually require printing at all, it’s worth starting here!
Digital Badges (No Printer Required!)
Want the easiest way to handle event badges? Digital badges through your event app are the perfect solution. They work well for smaller business events and team meetings where you don’t need physical badges. With digital badges in EventMobi’s mobile event app, you can:
- Control who goes where.
- Track attendance.
- Skip all the printing work.
Best for:
- Company meetings and team events.
- Small to medium-sized gatherings.
- Simple registration processes.
- Events requiring attendance tracking.
Self Pre-Printed Event Badges
Conference badge design tools like EventMobi’s Badge Designer help you create great-looking badges with just your computer and a printer! Just print them out and put them in badge holders—it’s that simple. This strategy works well for small events and saves money, but it gets harder to manage if you have over 100 attendees.
Best for:
- Small events without last-minute sign-ups.
- Community groups.
- In-house event teams.
- Cost-conscious planners.
Professionally Pre-Printed Conference Badges
Want badges that look extra polished without more manual work? Pre-printed badges work great for smaller events, too. You can also order badge stock in bulk if you run multiple events throughout the year—we’ll talk about using these with badge label printing next. EventMobi’s Pre-Printed Badge service delivers in seven days, with premium materials in North America and eco-friendly options in Germany (plus, it’s fully integrated with the EventMobi Badge Designer, so you can design your badge and place an order with just a few clicks!).
Best for:
- When you need help with printing and logistics.
- Organizations looking for bulk badge stock for multiple events.
- Events with dedicated check-in staff.
- Teams prioritizing quality and consistency.
Badge Label Printing
Want flexibility and a professional look? Badge label printing lets you combine pre-printed badge stock with on-the-spot printing. Keep professional badge stock on hand and print badge labels as people arrive. It saves money if you run lots of events because you can use the same badge stock again and again. Or, for small events, you can use your label printer with white badge labels to create polished peel-and-stick event name tags. Good label printers like the Brother QL-820WNB make sharp, clear badges every time. EventMobi can provide everything you need—from design software to hardware rentals and onsite support staff.
Best for:
- Events with ongoing registration and walk-ins.
- Organizations hosting many events.
- Conferences needing last-minute flexibility.
- Teams wanting quality without high costs.
Live Badge Printing
Need maximum flexibility for a big event? Live badge printing lets you create badges right when people check in. It’s perfect for large conferences with lots of walk-ins or last-minute changes. While this gives you the most options, it also costs the most. Most organizers choose this as a fully managed service—companies like EventMobi handle everything from printers and backup systems to onsite tech support. For big events, this full-service approach pays off in smooth check-in and happy attendees.
Best for:
- Events with a high volume of registrants.
- Events with many walk-in registrants.
- Conferences needing total flexibility.
- Events wanting branded check-in kiosks.
Step 2: Select Your Badge Material
The materials you choose for your event badges help set the tone. Different printing methods only work with certain materials, so let’s match them up:
Digital Badge Delivery
- Works through your event app or via email.
- Works with any registration system.
- Easy to scan at check-in.
- Shows up clearly on any smartphone.
- Perfect for eco-friendly events.
💡 Tip: Digital badges eliminate physical materials entirely, making them ideal for events where attendees are tech-savvy and sustainability is a priority. Test your QR codes in different lighting conditions to ensure glitch-free scanning.
Pre-Print Name Badges at Your Office Materials
- Pick 32lb bright white paper for best results.
- Try Avery 5392 Name Badge Inserts.
- HP Premium 32 or Hammermill Premium laser paper also works well.
- Order quality plastic event badge holders from office stores.
Tip: Better paper and holders make your badges look more professional.
Badge Label Printing Materials
- Use Brother DK Series badge labels for crisp printing.
- Standard 2.4 x 3.5-inch size typically works best.
- Compatible with Brother QL-820WNB.
- Use professional-grade badge stock from vendors like EventMobi.
- Choose white badge labels to create peel-and-stick event name tags.
💡 Tip: The key to successful badge label printing is matching your label material to your printer specifications. When pairing with badge stock, choose a material that will hold its shape and appearance throughout your event.
Pre-Printed Event Badge Professional Materials
- Choose from 16 or 20-pt cardstock.
- Get laminated badge stock or PVC for durability.
- North American events often use firm laminated stock.
- European events prefer recyclable paper.
💡 Tip: Most print providers offer various material options to suit different event needs and sustainability goals. Consider your event’s environment and duration when selecting material thickness and finish.
Live Badge Printing Materials
- Two-sided fanfold blank badges are the most common.
- Durable laminated options are also popular but add cost.
- Professional PVC badges are the most durable but least sustainable option.
- Most vendors offer eco-friendly choices, too.
💡 Tip: Live badge printing is typically offered as a fully managed service due to its complexity. Service providers like EventMobi can recommend the best material choice based on your event’s specific requirements and sustainability goals.
Watch the EventMobi Product Tour to learn how to create the best guest arrivals experience for your attendees.
Lanyard and Attachment Selection Guide
Pick the right lanyard and attachment to keep badges secure and easy to use:
Standard Polyester Lanyards
- Most affordable for large events.
- Lots of colors for brand-matching.
- Tough enough for multi-day events.
- Perfect for events with over 100 attendees.
💡 Tip: For most professional conferences, standard polyester offers the best balance of durability and value. Choose black for classic elegance or match your event colors for branding.
Premium Bamboo or Recycled PET lanyards
- Great eco-friendly choice.
- Extra comfortable to wear.
- Perfect for green events.
- Ideal for VIP conferences.
💡 Tip: These sustainable options often become talking points among attendees, adding value beyond their practical use.
Attachment Options:
Double-Ended Clips
- The most secure option available.
- Great for heavy badges.
- Perfect for multi-day events.
- Stop badges from flipping.
J-Hook Clips
- Quick and easy to use.
- Work with most badge holders.
- Budget-friendly choice.
- Good for simple badges.
Universal Card Clamps
- Won’t damage your badges.
- Look very professional.
- Safe for expensive materials.
- Perfect for high-end events.
Bulldog Clips
- Hold thick badges well.
- Popular with event staff.
- Easy to remove when needed.
- Great for frequent handling.
💡 Tip: Match your attachment type to your badge weight and usage. Double-ended clips are a practical choice for most professional conferences.
Step 3: Choose Your Badge Size
Getting your badge size right affects how well people can read them and how comfortable they are to wear. While custom sizes might seem tempting, standard sizes usually work best.
Digital Badge Display Sizes
- EventMobi’s event app automatically sizes badges for all devices.
- QR codes are optimized for reliable scanning.
- Works seamlessly across iOS and Android.
💡 Tip: Share instructions on how to download your event’s mobile app in advance so attendees can easily access their digital badges at check-in.
Best Size Options for Pre-Printing at Your Office
- Standard 4″ x 3″ size works best for most events.
- Pre-sized Avery name badge inserts are also practical.
- Both choices are compatible with standard badge holders.
💡 Tip: Standard sizes exist for a good reason—they’re optimized for readability while remaining comfortable to wear. Stick with these for your conference badge design unless you have a compelling reason to go custom.
Best Badge Sizes for Professionally Pre-Printed Badges
- Standard 4″ x 3″ for simple conference badge designs.
- 4″ x 6″ for conferences needing more information.
- Custom sizes up to 13″ x 13″ available.
- A6 size (9.7 x 13.4 cm) is common in Europe.
Choose bigger badges when you need:
- Multiple languages or QR codes.
- Space for sponsor ads.
- Important access control info.
💡 Tip: Professional printing services offer more size flexibility while keeping costs down. Larger sizes provide space for networking elements like icebreaker questions, special interests, or industry focus areas—details that can spark meaningful conversations between attendees.
Badge Label Printing Sizes
- Label size is 2.4″ x 3.5″ for names and details.
- Works with standard 4″ x 3″ and 4” x 6” professional badge stock.
- Simply print, peel, and stick to badge stock as attendees check in.
💡 Tip: Always match your label dimensions to your badge stock’s designated printing area. EventMobi’s pre-printed badge stock and badge label printing tools are designed to work together for perfect alignment.
Badge Size Options for Full-Service Live Badge Printing
- Standard conference size: 4″ x 3″.
- Extended size: 4″ x 6″.
- Custom sizes available based on printer specifications.
- Consider space allocated for custom design elements.
💡 Tip: While custom sizes are possible and can accommodate more information, staying with standard dimensions will maintain cost-efficiency and consistent badge quality.
Curious to learn how other planners approach their badge material, size, and printing method selection process? Watch the video below to learn how Hannah Gomes from the Independent Natural Food Retailers Association made her decision (and the results!).
Step 4: Decide On Your Conference Badge Design Tool
Professional conference badge design software transforms complex badge creation into a straightforward process, saving time while preventing common mistakes. Tools like EventMobi’s Badge Designer blend drag-and-drop simplicity with ready-made templates, freeing you from needing graphic designers or wrestling with complicated design programs. The intuitive platform guides you smoothly from initial template selection to final printing, making it easy to create polished, professional badges—no design expertise required. This approach lets you focus on creating badges that work beautifully for your event rather than getting caught up in technical details.
Essential Conference Badge Design Software Features
When evaluating conference badge design tools, prioritize these specific capabilities:
Registration System Connection
Your software should connect directly to your registration system to:
- Eliminate manual spreadsheet work.
- Update badges automatically when people register.
- Keep attendee information current.
- Make quick changes in one place.
- Reduce errors from data entry.
Template Options
Look for software offering:
- Professional event badge templates.
- Layouts for different event types.
- Easy customization tools.
- Clear, readable designs.
- Options for different attendee types or access levels.
Batch Processing
For large events, ensure you can:
- Create badges for different groups in bulk.
- Allow custom fields based on attendee type and requirements.
- Maintain consistent formatting across large batches.
- Process large data sets without system delays or errors.
- Support quick updates and reprints when needed.
Step 5: Design Your Event Badge
Creating memorable, functional badges starts with understanding core design principles that prioritize the attendee experience. Let’s explore how to make badges that work as hard as your event team does.
Essential Conference Badge Design Elements
Visibility and Clarity
- Make badges instantly readable from across the room.
- Ensure clear scanning visibility for check-in.
- Use high-contrast colors for maximum readability.
- Design for quick identification during networking.
- Test readability in various lighting conditions.
Name Display Hierarchy
- Make first names 30-40% larger than last names.
- Place the company name below the attendee’s name.
- Follow with job title or role.
- Use minimum 16pt fonts for all text.
- Maintain clear spacing between elements.
Branding Elements
- Place the conference logo modestly in the corner.
- Keep logo size minimal—attendees know where they are.
- Use event brand colors in subtle design elements.
- Create clean, simple layouts without clutter.
- Avoid complex design features requiring special printing.
Smart Information Layout
Front Side:
- Focus on networking essentials.
- Keep the design clean and uncluttered.
- Use balanced or centered layouts.
- Include only must-have information.
- Maintain a clear visual hierarchy.
Back Side:
- Place QR codes for easy scanning.
- Print the agenda upside-down for easy reading.
- Include Wi-Fi password and event app details.
- Add parking information if needed.
- Print event shortcode for digital access.
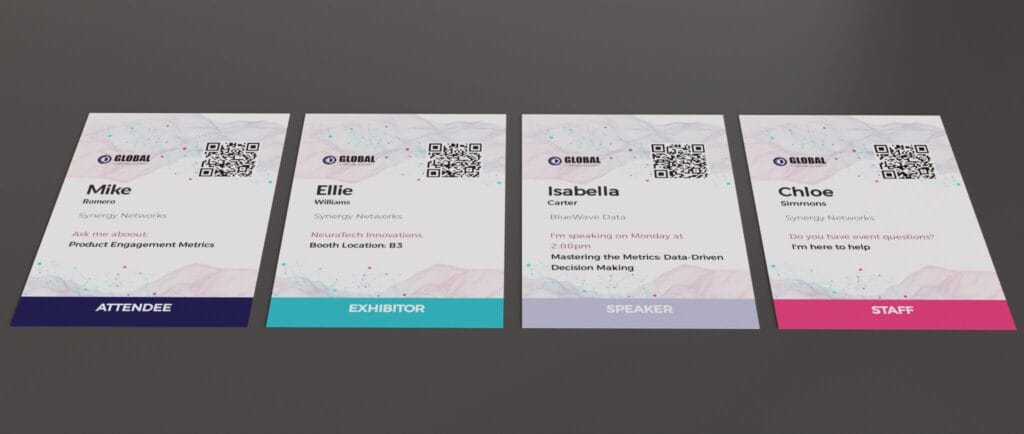
Attendee Differentiation
- Use color coding for different roles.
- Add booth numbers for exhibitors.
- Include clear speaker designations.
- Mark first-time attendees distinctly.
- Show attendance history for returning participants.
Networking Enhancement Features
- Add ice-breaker questions.
- Include “I’m here for:” conversation starters.
- Print special interests or expertise areas.
- Add industry-focus indicators.
- Consider social media handles if relevant.
Conference Badge Design Tips for Success
- Test badge readability from 6-8 feet away.
- Use high-contrast colors for text visibility.
- Leave enough white space around key information.
- Make first names stand out with larger fonts.
- Keep branding subtle and professional.
- Design for balance and visual hierarchy.
- Ensure QR codes don’t overpower the design.
- Choose clean, easy-to-read fonts.
Curious to see how a purpose-built conference badge design tool works? Check out this video to see how the EventMobi Badge Designer can help you create perfect event badges in seconds.
Step 6: Handle Data Integration
Registration systems that connect directly with your conference badge design tool streamline the entire process. By eliminating manual data entry and spreadsheet management, integrated systems prevent common mistakes while saving hours of work.
Registration System Integration Benefits
Automated Data Flow
- Eliminates error-prone spreadsheet work
- Updates badges instantly when people register
- Maintains current attendee records
- Handles special characters automatically
- Supports multiple languages seamlessly
Real-Time Management
Connected systems allow you to:
- Add last-minute registrations without stress
- Change names or titles instantly
- Update access levels on demand
- Fix company information in seconds
- Print replacement badges quickly
💡 Tip: Create a “test attendee” with special characters (é, ñ) to verify proper handling before going live.
Data Field Best Practices
Essential Fields
- First Name (required, 30-40% larger than last name)
- Last Name (required)
- Company Name (placed under full name)
- Job Title (under company)
- Attendee Type (for color coding)
- Access Level (if required)
- Special Designations (speaker, VIP, etc.)
- Unique Identifier/Badge ID
Optional Information Elements
- Pronouns (if appropriate for your event)
- Industry/Department
- First Timer designation
- Years attended
- Ice-breaker question
- Booth number (for exhibitors)
- Social Media Handles
- “I’m here for” statement
💡 Tip: Keep optional fields minimal—remember the design principle of including only essential information.
Step 7: Execute Your Badge Production
Different printing methods need different approaches. Here’s how to handle each type successfully.
Pre-Printed Badge Production
- Order seven days ahead for guaranteed delivery.
- Set up quality checkpoints for design elements.
- Verify text contrast and readability.
- Check QR code placement and scanning.
- Confirm proper punch hole alignment.
- Create organized storage systems.
- Plan distribution methods carefully.
- Train staff on handling procedures.
Badge Label Printing Setup
- Use professional printers (Brother QL-820WNB).
- Test print quality and contrast levels.
- Verify font sizes meet visibility standards.
- Ensure proper alignment with badge stock.
- Establish backup printing stations.
- Maintain adequate supply inventory.
- Create clear staff procedures.
- Document troubleshooting steps.
Live Badge Printing Management
- Install multiple printing stations.
- Set up backup equipment.
- Create template backup files.
- Test network connectivity.
- Document clear workflows.
- Prepare for technical issues.
- Monitor supplies continuously.
- Train staff on real-time adjustments.
💡 Tip: Always have a backup plan ready, regardless of your chosen printing method.
Conclusion: Conference Badge Design That Makes Your Event Shine
Conference badge design might seem like a small detail in event planning, but it’s one that shapes every attendee’s experience from the moment they arrive. The right badge design turns casual conversations into meaningful connections, helps attendees navigate your event confidently, and creates lasting impressions that extend beyond the event itself.

Book your EventMobi demo today for expert advice and learn how EventMobi can help you create the right check-in experience for your events.
Frequently Asked Questions
Submit orders seven business days before your event for guaranteed delivery through EventMobi’s pre-printed badge service. Allow additional time for quality checks and organization.
Badge Label Printing or live badge printing through EventMobi provides immediate updates for last-minute changes and walk-in registrations, with direct connection to your registration data.
A: Standard 4″ x 3″ badges fit most events. Select 4″ x 6″ badges when including schedules or sponsor information. EventMobi’s Badge Designer templates are optimized for both sizes.
EventMobi’s Badge Label Printing solution with pre-printed stock combines professional presentation and cost efficiency when hosting multiple events, including hardware rental packages and support.